Pages

Tuesday, September 24, 2024

A Coffee Date!


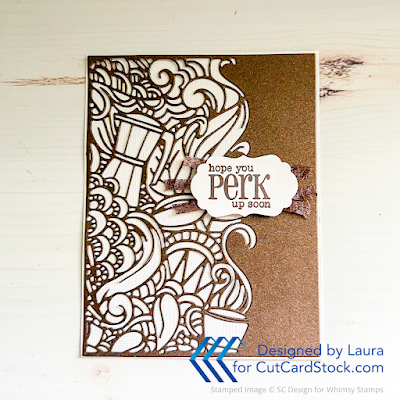
Are you a pumpkin spice kind of girl (or guy!)? It’s the season! I’m seeing a good friend of mine today for coffee — and our “date” inspired my card. 

I dug through my stash looking for anything coffee-themed and pulled out the stamps and metal die cuts. I began with an intricate die cut of a coffee cup, an old-fashioned percolator — just like my mother-in-law’s— and beautiful swirls of steam.


It’s a very difficult die where on the first try it didn’t cut through on my old manual Big Shot die cut machine. But I learned in a Facebook card-making group that with metal dies that just don’t cut all the way, feed the die-cut machine with bubble wrap as a shim. And it worked!


You can see how intricate the die is.


I used Stardream Metallic Saturn 126 lb 8.5 x 11 Card StockIt’s a sparkly bronze metallic that really catches the light and shines. 


I popped out the tiny pieces of the die using a Cricut tool. 


Then gluing it down was easy if you used a fine-tip glue applicator (I used Art Glitter Glue) and used thin lines or dots.


I feed my coffee obsession with a lot of coffee stamp sets, so after rummaging through them, I found an unused Clearly Whimsy Stamps’ “Coffee Break Additions” from the Clearly Whimsy Stamps Collection. It says “hope you perk up soon,” and think that is a perfect get well soon card sentiment. 


I cut the sentiment with another metal die that I had in my collection — yes I have a collection of them too! I used double-sided tape on the reverse side and adhered to three pieces of metallic bronze ribbon, which to my surprise matched the Bronze color card stock perfectly. I added 3D adhesive dots to the back of the die-cut and placed it on my card.


I then glued the die-cut image to DCS Shimmery Textured Wedding Cake 8.5x11 inch White Card Stock, my favorite paper for its shimmer, and cut it down to 4.25x5.50 inches. 


And my card is finished, ready for my friend today, who needs a little lifting up. Hope that you enjoyed this project — and I’d love to see any coffee-themed projects that you are inspired to make.

Thursday, September 12, 2024

Masculine Birthday Cards


If you are like me, you may find masculine cards challenging to make. But the best way to begin is by choosing a color scheme based on patterned papers, and I went with brown, green and cream. 

I used DCS Discount Card Stock: Vanilla Bean Brown Card Stock and different sheets of Basic Grey, which is a limited edition designer paper from years back. It’s called Sweet Threads, a light colored fabric-like print with one bold green and brown design, which I used on every   card.  On one of the cards, I used green laser cut mat that I had on hand.


To give the card some depth I used two different embossing folders: a woodgrain Sizzix and sort of framed border from Sizzix’s Tim Holtz Alterations. I ran the brown card stock through the Big Shot. Right now there are a lot of manual die cutting machines on the market, and favorites become controversial. Some people are die cut traditional while others embrace the new machines. They are wider, some automated, and others emboss easily. I still have my ten-year-old (or more!) black Big Shot, and I find with a few shims, I can do most of what the new machines do. I am waiting for the machine to break, and then I have tough decision on which brand and make to use.


I love to use up a stack of patterned papers and this one was no different. I selected five different patterns from the paper kit and layered them on the card front. I found that the white edges detracted from the card, so I did some inking. Typically I use ink daubers, but I had purchased new sponges that have fine bristles and inked the edges in brown ink.


One of the the sentiments is from older Stampin’ Up! stamp sets. Sometimes I pull stamps from different stamp cases (and makers) and organize them by category — and I pulled my birthday sentiment case. The Stampin’ Up! cases are slim plastic cases with spines and cover reflecting the stamps. I had bought a few blank cases and used my label maker for the spine.  It sure beats looking through my whole collection of stamps.


On all the cards, I used a variety of embellishments from rhinestones to sequins. Thank you for stopping by the blog today!